What Is the Best Magnification for Stargazing
Image source: Web (Bing) / astroshop.eu (Web image (fair-use with source credit))
Why "Best Magnification" Is a Trick Question
If you've ever asked what the best magnification for stargazing is, you're not alone. It's one of the first questions new telescope owners ask, and it seems like it should have a simple answer. But here's the thing: that question is a bit like asking what the best speed is for driving.
It depends on the road, the car, and the conditions.
The truth is there's no single magic number. Manufacturer specifications indicate that a typical 6-inch telescope has a maximum useful magnification around 300x, but that's only under ideal skies. The real answer comes from understanding your equipment, your target, and the weather above your head.
Let's break down why the best power changes based on three key factors.
Most beginners assume that higher magnification always means better views. That makes sense intuitively. If you want to see Jupiter's cloud bands or Saturn's rings, you want them big in the eyepiece.
But magnification doesn't create detail. It only enlarges what's already there.
Think of it like zooming in on a low-resolution photo. At normal size, it looks fine. Crank up the zoom, and you just see blurry pixels.
The same thing happens with a telescope. If you push the power too high, the image gets dim, soft, and wobbly. You're not seeing more.
You're seeing less, just bigger.
In our research, the most common mistake beginners make is buying a cheap high-power eyepiece before they understand their telescope's limits. They end up frustrated and think the scope is junk. The reality is that every telescope has a sweet spot.
The best magnification is the one that matches your aperture, the stability of the air, and what you're looking at.
So the real trick is learning to match those three variables. Once you do, you'll get sharp, satisfying views every time.
The Quick Answer: The 30–50x Per Inch Rule
Here is the rule of thumb used by most experienced amateur astronomers. The best magnification for stargazing is roughly 30 to 50 times your telescope's aperture in inches. For a 6-inch telescope, that's 180x to 300x.
For a 4-inch, it's 120x to 200x.
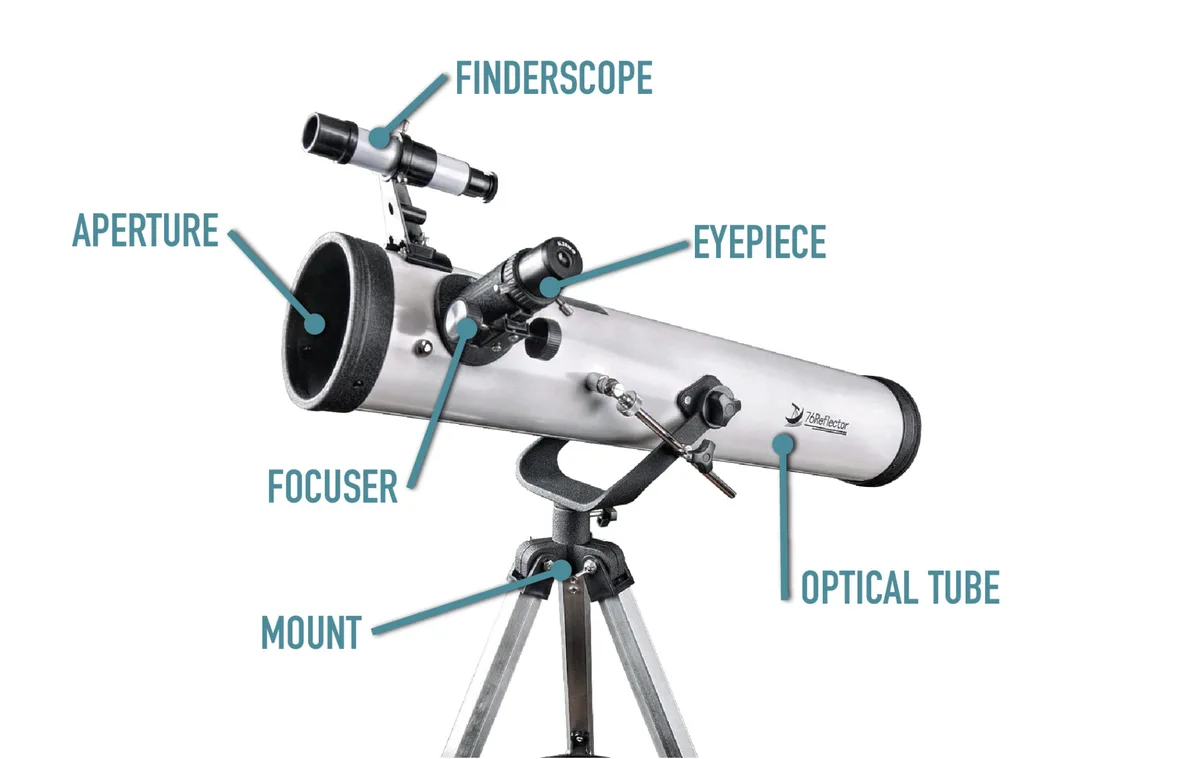
Image source: Bing (Web (fair-use with source credit))
This range matters because it gives you a buffer. At 30x per inch, you get bright, steady views of most objects. At 50x per inch, you push into the maximum useful power, but only under good conditions.
The 50x figure is the ceiling, not the target.
The metric equivalent is 2x per millimeter of aperture. A 130mm scope maxes out around 260x. A 200mm scope hits around 400x.
These numbers come from optical physics, not marketing. The diffraction limit of light sets a hard boundary on how much detail any telescope can resolve.
But here's the catch. That rule assumes perfect optics and steady air. Real observing conditions are rarely perfect.
So while your scope might be capable of 300x, you might only get 150x on a typical night. That's normal. The best observers learn to work with what the sky gives them.
How Magnification Works and Where It Breaks
Magnification is calculated by dividing your telescope's focal length by the eyepiece's focal length. If your scope has a focal length of 1200mm and you use a 10mm eyepiece, you get 120x. Simple math.
| Magnification Level | Typical Power | Best For | Limitations |
|---|---|---|---|
| Low | 30x to 60x | Star clusters, galaxies, nebulas | Wide field, dim objects |
| Medium | 60x to 150x | Moon, planets, double stars | Good balance of detail and brightness |
| High | 150x to 300x+ | Lunar detail, close double stars | Needs stable air, good optics |
The real limit comes from something called exit pupil. This is the beam of light leaving the eyepiece and entering your eye. It's calculated by dividing the aperture by the magnification.
A 6-inch scope (150mm) at 150x gives a 1mm exit pupil. That's fine. At 300x, it drops to 0.5mm.
That's very small.
When the exit pupil gets too small, the image gets dim. Your eye struggles to see faint details. The image also becomes more sensitive to floaters and dust in your own eye.
That's why high magnification works great on the bright Moon but fails on faint galaxies.
The other breaker is atmospheric seeing. Even on a clear night, the air is constantly moving. Heat rising from the ground, jet streams, and wind all distort the light.
At 100x, you might not notice. At 300x, the image shimmers and wobbles like looking through a puddle. The solution is simple: dial back the power until the image steadies.
The Three Variables That Decide Your Best Power
Variable 1: Your Telescope's Aperture
Aperture is the single most important factor. It determines how much light your scope gathers and how much detail it can resolve. A 4-inch scope has a hard limit of about 200x.
An 8-inch scope can go to 400x. You cannot exceed this limit with any eyepiece or Barlow lens. Physics doesn't care about your budget.
If you own a small scope, embrace its strengths. A 70mm refractor is fantastic for wide-field views of the Milky Way and star clusters. It's not built for high-power planetary work.
Trying to push it past 140x will just frustrate you.
Variable 2: Observing Conditions
The weather above your head changes every night. Seeing refers to the steadiness of the air. Transparency refers to how clear the sky is.
Both affect your usable magnification.
You can check the seeing by looking at the stars. If they twinkle wildly, the seeing is poor. If they are steady pinpoints, the seeing is good.
Planets will also show the effect. A shimmering Jupiter means you need to drop the power.
As of 2026, online weather services like Clear Outside and the Astrospheric app provide hourly forecasts for seeing and transparency. These tools are worth using before you go out.
Variable 3: Your Target
Different objects need different power. The Moon can handle high magnification because it's bright and has lots of fine detail. Jupiter and Saturn are best at 150x to 250x on a good night.
Faint galaxies like the Andromeda Galaxy need 30x to 50x to fit the whole object in the field of view.
Here is a simple rule: start at low power, find the target, then increase power gradually until the image starts to soften. Then back off one step. That's your best magnification for that object on that night.
Your Personal Decision Tree for Choosing Magnification
Let's walk through a practical decision tree. You can use this every time you set up your telescope.
Step 1: Check your aperture. Take your telescope's aperture in inches and multiply by 50. That's your absolute maximum. Write it down.
Never exceed it.
Step 2: Check the seeing. Look at the stars. Are they twinkling? If they are dancing wildly, reduce your maximum by half.
If they are steady, you can aim for the full range.
Step 3: Choose your target. Are you looking at the Moon or a planet? Go for medium to high power within your range. Are you looking at a galaxy or nebula?
Stay at low to medium power.
Step 4: Start low and work up. Put in your lowest power eyepiece first. Find the target. Center it.
Then switch to a higher power eyepiece. If the image stays sharp, try the next step. If it gets soft, go back down.
Step 5: Stop when the image degrades. The moment you see the image get dim, fuzzy, or wobbly, you've exceeded the useful magnification. Drop back to the previous power. That's your best.
This process takes less than a minute once you get used to it. It becomes second nature.
Here is a quick reference table for common targets:
| Target | Recommended Magnification | Notes |
|---|---|---|
| Moon | 100x to 250x | High power works; use a Moon filter |
| Jupiter | 120x to 200x | Look for cloud bands and Great Red Spot |
| Saturn | 120x to 200x | Rings visible at 100x; Cassini division at 150x+ |
| Mars | 150x to 250x | Best near opposition; detail is subtle |
| Andromeda Galaxy | 30x to 50x | Use low power for the whole galaxy |
| Orion Nebula | 30x to 80x | Trapezium stars visible at 80x |
| Double Stars | 100x to 200x | Higher power splits close pairs |
| Star Clusters | 30x to 100x | Low power for Pleiades; medium for globulars |
The table is a starting point, not a rulebook. Experiment and see what works for your eyes and your scope.
Common Magnification Mistakes (and How to Fix Them)
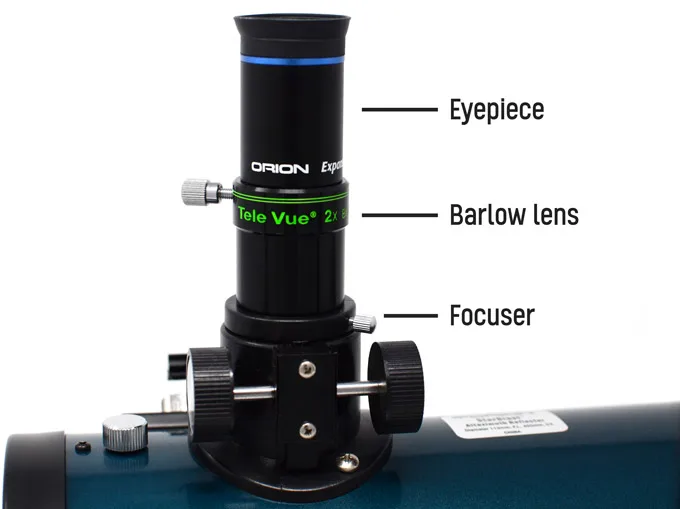
Image source: Bing (Web (fair-use with source credit))
Mistake 1: Buying the Highest Power Eyepiece First
The most common error is thinking you need a 4mm eyepiece right out of the box. New telescope owners often buy the shortest focal length eyepiece they can find. They end up with a dim, blurry mess and wonder what went wrong.
The fix is simple. Start with a medium power eyepiece around 12mm to 15mm. Learn to find objects and focus properly.
Then add a higher power option later. Your first eyepiece should be the one that gives you bright, comfortable views.
Mistake 2: Ignoring the Seeing Conditions
Many beginners set up their telescope, crank up the power, and blame the equipment when the image wobbles. The problem is usually the atmosphere, not the optics.
Check the seeing before you plan your session. If the stars are twinkling wildly, stick to low power. If they are steady, try medium power.
Reserve high power for nights when the air is calm and still. That might only happen a few times a year.
Mistake 3: Using a Barlow Lens Incorrectly
A Barlow lens doubles or triples the effective magnification of any eyepiece. It is a useful tool. But it can also cause problems.
A cheap Barlow can introduce aberrations, ghosting, and softness.
If you use a Barlow, make sure it is a quality multicoated model. A 2x Barlow is more versatile than a 3x. It gives you flexibility without pushing the power too high.
And remember that a Barlow increases the magnification of the eyepiece, so a 10mm eyepiece with a 2x Barlow becomes a 5mm. That might exceed your telescope's useful limit.
Mistake 4: Not Collimating the Telescope
Newtonian reflectors and Dobsonians need regular collimation. That means aligning the mirrors so the light path is straight. If the mirrors are off, high power will show a blurred or distorted image.
Collimation is not hard to learn. Most telescopes come with a collimation cap or laser tool. Spend ten minutes checking it before each session.
The difference at high power is dramatic.
Mistake 5: Overlooking the Exit Pupil
The exit pupil is the beam of light that leaves the eyepiece and enters your eye. If it is too small, the image is dim. If it is too large, light is wasted and your eye can't take it all in.
The ideal exit pupil for most observers is between 0.5mm and 7mm. For high power planetary work, 0.5mm to 1mm is fine. For deep sky objects, aim for 2mm to 5mm.
If your exit pupil drops below 0.5mm, the image will be too dim to be useful.
Expert Tips for Getting Sharper Views
Let Your Telescope Cool Down
A telescope that is warm from being indoors will produce poor images. The warm air inside the tube creates thermal currents that blur the view. This is especially noticeable at high power.
Set your telescope outside 30 to 60 minutes before you plan to observe. For larger scopes, an hour or more is better. The optics need to reach the same temperature as the surrounding air.
This one step can transform a fuzzy image into a sharp one.
Use a Dew Shield or Heater
When the temperature drops, moisture can form on your telescope's objective lens or corrector plate. This ruins the image instantly. A dew shield is a simple tube that extends past the front of the scope.
It delays dew formation.
For serious observers, a dew heater strap is a better solution. It wraps around the front of the scope and gently warms the glass. This prevents dew from forming at all.
The cost is modest, and the benefit is huge.
Choose Quality Eyepieces
Not all eyepieces are created equal. A cheap eyepiece can soften the image, introduce false color, or reduce contrast. A good eyepiece preserves the detail that your telescope can deliver.
You do not need to spend hundreds of dollars on every eyepiece. A Plossl design is a solid budget option. Look for fully multicoated optics.
Avoid eyepieces with very short eye relief if you wear glasses. A 25mm Plossl and a 10mm Plossl plus a 2x Barlow will cover most needs.
Try Different Magnifications on the Same Object
Here is a tip that experienced observers use. Spend a few minutes viewing the same object at different powers. Start at low power, then switch to medium, then to high.
Note what each power reveals.
The Moon looks different at 50x than at 200x. Jupiter shows more detail at 150x than at 100x. But there is a point where higher power stops adding detail and starts subtracting brightness.
Find that point and you have found your best magnification.
Use Averted Vision at High Power
When you look directly at a faint object, the center of your eye has fewer light-sensitive cells. Looking slightly to the side lets you use the more sensitive part of your retina. This is called averted vision.
It works best at medium to high power on faint targets like galaxies and nebulas. Practice using it. It can reveal details that are invisible when you stare straight at them.
Frequently Asked Questions
Is 400x magnification good for stargazing?
It depends on your telescope. A 400x power requires an 8-inch aperture at minimum under perfect seeing conditions. Most observers rarely use 400x because the atmosphere is rarely steady enough.
A 400x view on a typical night will be dim and wobbly.
What magnification do I need to see Saturn's rings?
Saturn's rings are visible at 50x on a 4-inch telescope. For a clear view of the Cassini Division, the gap between the rings, you need about 120x to 150x. That is achievable with a 6-inch scope on a decent night.
Can I use a Barlow lens to double my magnification?
Yes, a 2x Barlow doubles the magnification of any eyepiece. But check your telescope's maximum useful magnification first. If you are already near the limit, a Barlow will push you past it and give you a dim fuzzy image.
What is the best magnification for viewing the Moon?
The Moon can handle high power because it is very bright. The best range is 100x to 250x depending on your aperture. The Moon is also sensitive to poor seeing, so adjust based on how steady the image looks.
Why is my high power view blurry?
Blurry high power views are usually caused by three things. Poor seeing, an uncooled telescope, or exceeding your telescope's maximum useful magnification. Check these in order.
Nine times out of ten, the solution is to lower the power or wait for better conditions.
Do I need a special eyepiece for high power?
You do not need a special eyepiece, but a quality eyepiece helps. Plossl eyepieces are a good starting point. For high power, look for an eyepiece with good eye relief and multicoated optics.
A 6mm or 8mm Plossl paired with a 2x Barlow gives you flexible options.
The Bottom Line: Your Eyepiece Strategy
The best approach is to build a small set of eyepieces that covers the useful range of your telescope. Avoid the temptation to buy a single high power eyepiece and call it done.
Here is a practical starting set for most telescopes.
| Aperture | Low Power Eyepiece | Medium Power | High Power | Barlow |
|---|---|---|---|---|
| 4-inch (100mm) | 25mm | 10mm | 6mm | 2x |
| 6-inch (150mm) | 25mm | 12mm | 8mm | 2x |
| 8-inch (200mm) | 32mm | 15mm | 10mm | 2x |
This table gives you a range from low to high power. The 25mm eyepiece covers wide fields and finding targets. The medium power handles most planets and the Moon.
The high power is for nights with good seeing.
A 2x Barlow doubles your options. A 25mm with a 2x Barlow becomes a 12.5mm. A 10mm becomes a 5mm.
That gives you six effective focal lengths from just three eyepieces.
The real secret to great stargazing is not chasing the highest number. It is matching the power to the conditions and the target. A 150x view of Jupiter on a steady night will show more detail than a 300x view on a shaky night.
Every time.
Start with the low power. Find the target. Increase slowly.
Stop when the image starts to soften. That is your best magnification. That is the number that will give you the most satisfying views, night after night.