How to Start a Fire in a Fire Pit
You've stacked the wood just right. You've flicked the lighter. And nothing happens.
Or worse, you get a plume of smoke that makes everyone move to the other side of the patio. Learning how to start a fire in a fire pit isn't complicated, but it does require understanding a few key variables that most people overlook.
The single biggest factor is wood moisture. Per U.S. Forest Service guidelines, wood with a moisture content above 20 percent simply won't burn cleanly.
It smolders, smokes, and often goes out. That's the difference between a roaring fire and a frustrating evening. Let's walk through the conditions that determine your exact method, so you never have to guess again.
Image source: Bing (Web (fair-use with source credit))
Quick Answer
Use dry, seasoned hardwood. Split logs into kindling no thicker than your thumb. Build a teepee or log cabin lay.
Place a fire starter underneath. Light it from the bottom. Add larger logs once the kindling catches.
Keep airflow open. Never use gasoline or lighter fluid.
Why Your Fire Keeps Going Out (And How to Fix It)
Three things kill a fire before it really gets going: wet fuel, poor airflow, and impatience. Let's tackle each one.
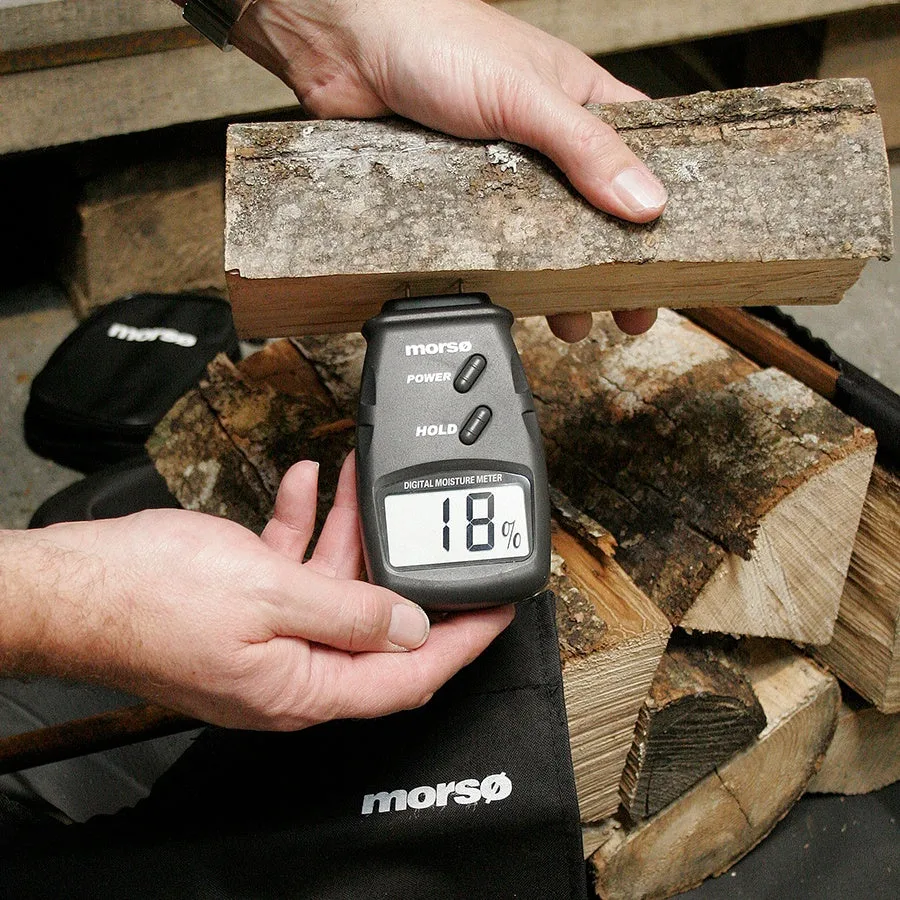
Image source: Bing (Web (fair-use with source credit)
Wet wood is the number one culprit. If your logs feel damp, look green, or hiss when placed near a flame, they're too wet. A moisture meter costs about 15 dollars and instantly tells you the moisture content. Anything above 20 percent needs more drying time.
Seasoned wood that has been split and stacked for at least six months is your best bet.
Bad airflow is equally common. Many fire pits sit too deep or have blocked vents. Ash buildup after a few fires can choke the oxygen supply. Clean out the ash before each use.
Make sure the fire pit has gaps or holes near the bottom for air to feed the flames. Some designs handle this better than others, which is why designs that reduce smoke are worth considering if you're in the market.
Impatience shows up when people add big logs too soon. Small kindling needs to establish a strong coal bed before you feed it anything larger. That takes about 10 to 15 minutes. If you pile on full-sized logs before that bed forms, you smother the fire.
Wait for the kindling to burn down to glowing embers, then add your first split log.
One more thing: the National Fire Protection Association recommends keeping your fire pit at least 10 feet from any structure. Safety matters just as much as technique.
The 3 Conditions That Decide Your Fire-Starting Method
There is no single best way to start a fire. The right method depends on three variables. Here is the decision tree.
Condition 1: Wood moisture and size. If your wood is bone-dry, you can use almost any fire lay. If it's slightly damp or freshly split, you need a method that concentrates heat, like the teepee. If you only have large logs and no kindling, the upside-down method works best because it burns from the top down, drying the wood as it goes.
Condition 2: Wind conditions. On a calm day, any fire lay works. On a windy day, you need a structure that protects the flame. The lean-to method uses a large log as a windbreak with kindling leaning against it.
The teepee can also work if you build it tight and low. On very windy days, consider using a windscreen or a model with a built-in wind guard.
Condition 3: Fire pit design. A shallow, open bowl allows more airflow but also lets wind interfere. A deep, enclosed fire pit holds heat better but can suffocate a young fire. If your pit is deep, use the log cabin method because it creates a chimney effect.
If it's shallow, the teepee works well. Smokeless fire pits like those with double-wall construction need a specific approach: build the fire in the center of the bowl, keep it small, and let the secondary burn do its job.
Here is a quick reference table for matching conditions to methods.
| Condition | Best Fire Lay | Why It Works |
|---|---|---|
| Damp wood | Teepee | Concentrates heat at the top |
| Windy day | Lean-to | Large log blocks wind |
| Deep fire pit | Log cabin | Chimney effect improves draft |
| Shallow fire pit | Teepee | Open sides allow airflow |
| Wet or large logs | Upside-down | Burns top-down, dries lower logs |
If you have a multi-fuel or propane fire pit, the process changes completely. Models with electronic ignition just need a button press. But for wood-burning pits, these conditions are your starting point.
Fire Lay Methods: Choosing the Right One and Building It Step by Step
Let's walk through the three most reliable methods. Each has a specific use case.
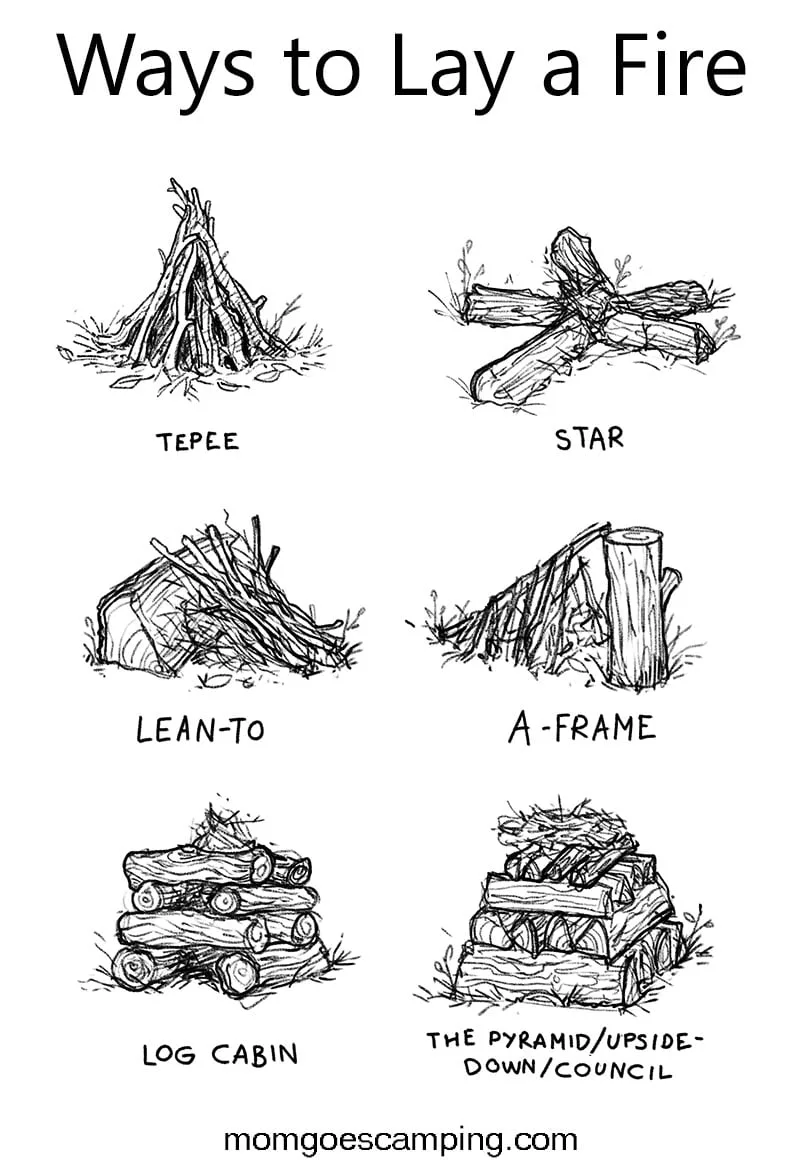
Image source: Bing (Web (fair-use with source credit))
The Teepee Method. This is the classic for a reason. Place a fire starter or a small bundle of tinder in the center of the fire pit. Lean kindling sticks around it in a cone shape, like a teepee.
Leave a small gap on the windward side for lighting. Light the tinder. The flames climb up the sticks, catching the tips.
As the kindling burns, it collapses inward, feeding the center. Add larger logs once the kindling bed is established.
This method works best with dry wood and calm conditions. It's fast and easy to light. The downside is that it burns through fuel quickly because the fire is concentrated in a small area.
If you let it collapse too early, you'll need to restart.
The Log Cabin Method. Place two larger split logs parallel to each other, about 6 inches apart. Lay two more logs across them at right angles, forming a square. Build up a few layers like a log cabin.
Place your tinder and kindling in the center of the square. Light the tinder. The walls of the cabin protect the flame from wind while the open center provides good airflow.
As the fire burns, the logs fall inward, creating a long-lasting coal bed.
This method is ideal for deeper fire pits or when you want a longer burn without constant attention. It also works well for cooking because it creates an even, flat bed of coals. The trade-off is that it takes a bit longer to catch because the kindling is more enclosed.
The Upside-Down Method. This is the most efficient but least intuitive. Start with your largest logs on the bottom, laid parallel. Add a layer of slightly smaller logs at right angles.
Continue with smaller wood, then kindling, then tinder on top. Light the top. The fire burns downward, drying the wood below as it goes.
This method produces almost no smoke because the fire burns hot and clean at the top, and the gases pass through the flame.
This is the best choice for damp wood or when you want a fire that lasts for hours without tending. It's also the least smoky of all methods. The catch is that it takes 15 to 20 minutes to catch fully, so patience is required.
Here is a table summarizing the key differences.
| Method | Best For | Burn Time | Smoke Level | Difficulty |
|---|---|---|---|---|
| Teepee | Quick start, dry wood | 30-45 min | Moderate | Easy |
| Log Cabin | Long burn, deep pits | 1-2 hours | Low | Medium |
| Upside-down | Damp wood, all-night | 2-4 hours | Very low | Medium |
Fire Won't Catch? Common Mistakes and How to Fix Them
Even with the right method, things can go wrong. Here are the most common mistakes and how to fix them.
Mistake 1: Using too much wood too fast. This is the most frequent error. People pile on logs before the kindling has a chance to create a coal bed. The fix is simple: start with only kindling.
Wait until you have a bed of glowing embers about the size of your fist. Then add one log at a time. If you add more than one log at this stage, you risk smothering the fire.
Mistake 2: Not enough tinder or kindling. A fire needs three things to start: tinder (easily combustible material), kindling (small sticks that catch from the tinder), and fuel (larger logs). If you skip the tinder or use too little kindling, the fire won't get hot enough to ignite the logs. A good rule of thumb is to use a handful of tinder and about 20 to 30 pieces of kindling, ranging from pencil-thin to thumb-thick.
Mistake 3: Blocking airflow. If your fire pit is full of ash, or if you've packed the wood too tightly, air can't reach the flame. The fire starves and dies. Clear out ash before each fire.
Leave gaps between your logs. If you're using a fire pit with a screen, make sure it's not clogged with soot. Some models are simpler to maintain than others, which is why low-maintenance designs are a popular choice for frequent users.
Mistake 4: Using the wrong fire lay for your conditions. Trying a teepee in a deep, enclosed fire pit will likely fail because the sides block airflow. Using the upside-down method with dry, small kindling is overkill and takes too long. Match the method to the conditions we discussed earlier.
If you're not sure, the log cabin is the most forgiving option.
Mistake 5: Lighting from the wrong side. Always light the fire from the bottom or the side where the most air is coming in. If you light from the top, the flame has to travel downward, which is much harder. For the teepee, light it from the windward side.
For the log cabin, light the tinder at the center base. For the upside-down method, light the top tinder and let it burn down.
If you've tried all of these and the fire still won't catch, check your wood again. It's almost certainly too wet. Split a piece and check the center.
If it feels damp or looks dark, it's not ready.
Frequently Asked Questions
What is the best wood to use in a fire pit?
Seasoned hardwoods like oak, hickory, birch, and ash burn longest and produce the least smoke. Avoid softwoods like pine or spruce for regular use. They burn fast, create more creosote, and throw sparks.
Kiln-dried wood with moisture under 20 percent is ideal.
Why does my fire pit smoke so much?
Smoke almost always comes from wet wood or poor airflow. Check your wood with a moisture meter. If it reads above 20 percent, it will smoke.
Also clean out ash buildup. The fire needs oxygen from below. If your pit has blocked vents, the fire smolders instead of burning clean.
Can I use lighter fluid to start a fire pit?
Manufacturer specifications and fire safety guidelines strongly advise against it. Lighter fluid creates flash fires and can cause dangerous flare-ups. It also leaves chemical residue in your fire pit.
Use a commercial fire starter, fatwood, or a DIY cotton ball with Vaseline instead.
How long does firewood need to season before use?
Split hardwood needs at least six months of seasoning. Ideally, aim for 12 to 18 months. Stack it off the ground, cover the top, and leave the sides exposed to airflow.
Kiln-dried wood is ready immediately. Green wood that has been cut less than six months ago will not burn well.
How do I safely put out a fire pit fire?
Spread the embers with a poker. Pour water slowly over the entire fire, not all at once. Stir the ash and embers with the poker.
Pour more water. Repeat until no steam or hissing comes from the ash. Feel the ash with your bare hand.
If it is warm, it is not out.
What is the easiest fire lay for a beginner?
The log cabin is the most forgiving. It protects the flame from wind, creates good airflow, and produces a long-lasting coal bed. It takes a few minutes longer to catch than a teepee, but it is much harder to mess up.
Start with the log cabin until you build confidence.
Your Fire-Starting Decision Guide
Let's pull everything together into a simple decision path. You'll never have to guess again.
Step 1: Check your wood. Split a piece. If the center feels damp, stop. Your fire will fail.
Get kiln-dried or properly seasoned wood. If you store wood yourself, keep it covered on top but open on the sides. A tarp that touches the sides traps moisture and creates mold.
Step 2: Clean your fire pit. Remove all old ash. Check the vents or gaps at the bottom. Make sure they are clear.
If your fire pit has a grate, give it a quick brush. Ash buildup is the silent killer of good fires.
Step 3: Choose your fire lay based on conditions. Calm day with dry wood: teepee. Windy day: lean-to. Deep or enclosed pit: log cabin.
Damp wood or long burn: upside-down. If you are unsure, go with the log cabin. It is the most reliable all-around method.
Step 4: Build the fire correctly. Place your fire starter or tinder. Add kindling in the pattern you chose. Light from the bottom or the side with the most airflow.
Wait for a coal bed before adding any logs. This takes patience, but it is the difference between a roaring fire and a smoky mess.
Step 5: Add fuel gradually. Once the kindling has burned down to glowing embers, add one split log. Wait for it to catch fully before adding another. Stack logs loosely to allow airflow.
If the fire starts to smoke heavily, you added too much wood too fast.
Step 6: Manage the burn. Adjust the screen or lid to control airflow. Open vents for more heat, close them slightly to slow the burn. Use a poker to rearrange logs if needed.
A well-managed fire can burn for hours with minimal attention.
Step 7: Extinguish completely. Never leave a fire unattended, even embers. Follow the water method described in the FAQ. Stir until the ash is cool to the touch.
This is non-negotiable for safety.
If you are in the market for a new fire pit, the design matters for how easy the fire is to start and maintain. Models with good airflow, shallow bowls, and easy-clean features simplify the process. Check out some of the best-rated options for your specific setup, whether you need a model for a gravel patio, concrete patio, or an outdoor living space.
The right fire pit makes the whole process smoother from the first match.
One last thing: practice. The first few fires might not be perfect. That is normal.
You are learning to read the wood, the wind, and your fire pit. After a few tries, you will be able to start a clean, hot fire in under five minutes without thinking about it. That is the goal.
And once you get there, you will wonder why you ever struggled in the first place.