How to Choose Binoculars
Most people pick binoculars by looking at the magnification number and hoping for the best. That's a mistake. If you're wondering how to choose binoculars, the answer starts with understanding what those numbers actually mean for your eyes and your specific use case.
Manufacturer specifications indicate that the most common all-purpose binocular is an 8×42. But that doesn't make it the right choice for everyone. The right pair depends on three things: what you're looking at, when you're looking, and whether you wear glasses.
Let's walk through it step by step.
Quick Answer
Choose binoculars by matching three specs to your use case. Magnification controls how close things look. Objective lens size controls brightness.
Exit pupil connects the two. An 8×42 works for most people.
Image source: Bing (Web (fair-use with source credit))
The Core Problem: Why Picking Binoculars Feels Overwhelming
Walk into any outdoor store or browse online, and you'll see dozens of models. The numbers look like a secret code. 8×42. 10×50. 7×35. 12×25. Each combination promises something different.
Nobody explains what the trade-offs actually are.
The real problem is that most advice focuses on the product instead of the person. You don't need to know every spec on the market. You need to know which three or four specs matter for your eyes and your activity.
That's a much shorter list.
Aggregate reviews across thousands of buyers show a clear pattern. People who buy based on magnification alone often end up disappointed. They get a 10x or 12x pair that shakes too much to use.
Or they buy a compact 8×25 that goes dark at dusk. The frustration isn't the binoculars. It's the mismatch between the specs and the situation.
This is where a decision tree approach helps. Instead of comparing every model, you answer a few questions about yourself. What will you watch?
Birds, sports, stars, or wildlife? When will you use them? Midday, dawn, or both?
Do you wear glasses? The answers narrow your options fast.
The binocular market is massive. Hundreds of models span price ranges from $30 to over $3,000. Without a clear decision framework, you're just guessing.
And guessing on a purchase that should last you a decade or more is a waste of money.
By the end of this guide, you'll know exactly which specs to look for. No guesswork. No wasted money.
You'll know why an 8×42 works for most people and exactly when to pick something different.
The Only Numbers That Really Matter: Magnification, Objective Lens, and Exit Pupil
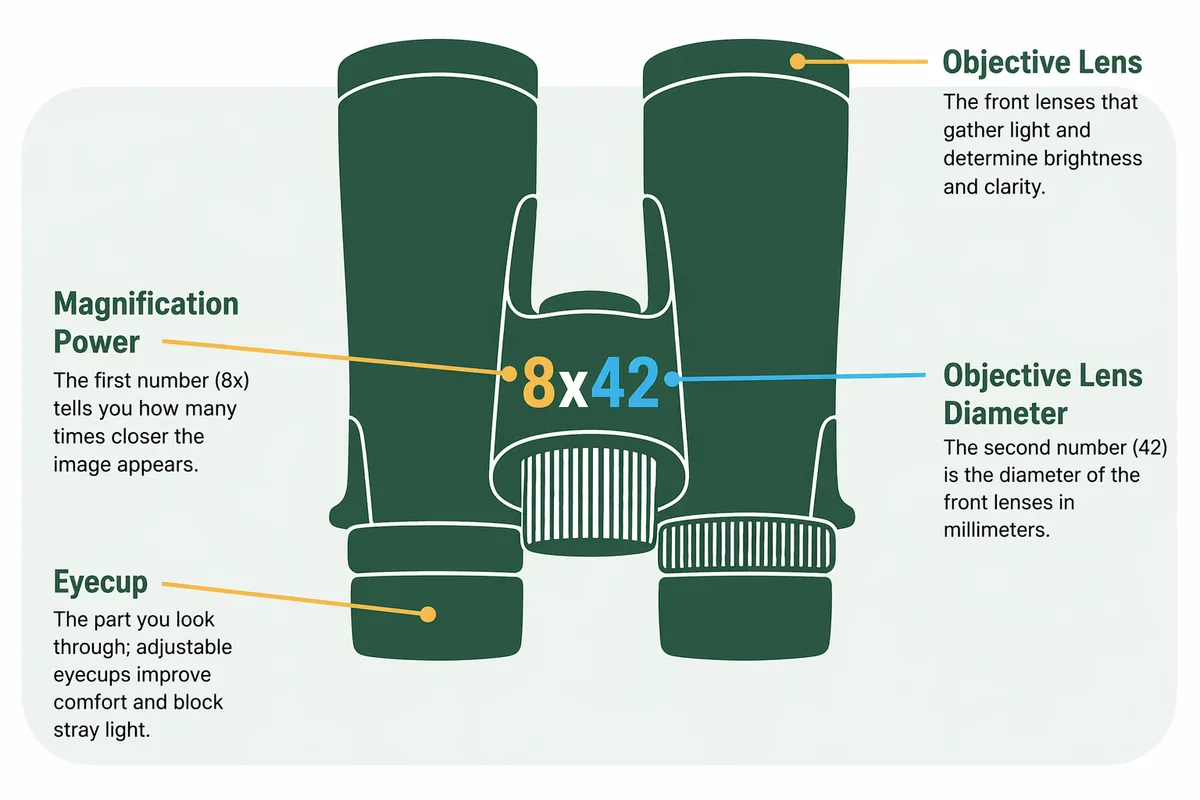
Image source: Bing (Web (fair-use with source credit))
Every binocular has two numbers printed on the body, like 8×42. The first number is the magnification. The second is the objective lens diameter in millimeters.
These two numbers together tell you almost everything you need to know.
Magnification makes distant objects appear closer. An 8x binocular makes something look eight times closer than with your naked eye. A 10x makes it look ten times closer.
Simple enough. But higher magnification also magnifies your hand shake. That's a trade-off most people don't consider.
The objective lens is the front lens, the one facing away from you. A larger lens collects more light. A 42mm lens gathers roughly four times more light than a 20mm lens.
That matters in low light, like at dawn or dusk. But larger lenses also mean more weight and bulk.
Exit pupil is the third number, and it's the one most people skip. You calculate it by dividing the objective lens size by the magnification. For an 8×42, that's 42 divided by 8, which equals 5.25mm.
That number tells you how bright the image will look to your eye.
Per ISO 14132 standards, the exit pupil determines how much light actually reaches your retina. A larger exit pupil means a brighter image, especially in dim conditions. The human pupil dilates to about 7mm in total darkness and shrinks to about 2mm in bright sunlight.
As of 2026, most optics experts recommend an exit pupil of at least 4mm for general use and 5mm or more for low light conditions.
Here's how the three numbers work together in practice:
| Spec | 8×32 | 8×42 | 10×42 | 10×50 |
|---|---|---|---|---|
| Magnification | 8x | 8x | 10x | 10x |
| Objective lens | 32mm | 42mm | 42mm | 50mm |
| Exit pupil | 4.0mm | 5.25mm | 4.2mm | 5.0mm |
| Relative brightness | 16 | 27.6 | 17.6 | 25 |
| Best for | Daytime, hiking | All purpose | Distance, open fields | Low light, astronomy |
The relative brightness number is the exit pupil squared. It's a rough guide to how bright the image will appear. A value above 20 is good for low light.
Below 15 works best in full daylight.
The three numbers work together. Change one, and the others shift. That's why the decision tree starts with these three specs.
Once you understand them, you can ignore most of the marketing claims and focus on what actually matters.
How to Choose Your Magnification: 8x, 10x, or More
Start with magnification. It's the most visible spec, and it's the easiest to get wrong. The wrong choice leads to shaky images or a view that feels like looking through a straw.
If you are new to binoculars, pick 8x. It's the most forgiving. The image stays steady in your hands.
The field of view is wider, which makes it easier to find and follow moving subjects like birds or athletes. Aggregate reviews indicate that 8x is the most common recommendation across birding, hiking, and general wildlife observation. It's the gold standard for a reason.
If you already have steady hands or plan to use a tripod, 10x gives you more reach. You'll see more detail at a distance. The trade-off is a narrower field of view and more visible hand shake.
For most people, 10x is the practical upper limit for handheld use. Anything above that requires a steady rest or a tripod.
If you are watching stadium sports from the stands or scanning open fields, 12x or 15x can work. But you will need a tripod or a very steady rest. The image shake at these magnifications makes handheld viewing frustrating.
Manufacturer specifications show that binoculars above 10x typically have a field of view under 300 feet at 1,000 yards.
If you are stargazing, consider 7x or 8x with a large objective lens. Astronomers often prefer 7×50 for the wide exit pupil and bright image. The 7x magnification keeps the stars steady, and the 50mm lens collects plenty of light.
You don't need high magnification for astronomy. You need light gathering.
If you are hunting in thick woods or brush, lower magnification can actually help. A 6x or 7x gives you a wider field of view for spotting movement at close range. You don't need high power when the deer is 50 yards away.
You need to see the whole scene.
Here's a quick breakdown of magnification by use case:
| Magnification | Best For | Considerations |
|---|---|---|
| 6x–7x | Hunting in brush, stargazing, kids | Widest field of view, steadiest image |
| 8x | Birding, hiking, general use | Best all-around choice for most people |
| 10x | Distance wildlife, open fields, sports | More reach, narrower field, requires steadier hands |
| 12x–15x | Long distance, tripod use | Shaky handheld, needs support |
| 15x–20x | Astronomy, tripod required | Very narrow field, image stabilization helpful |
The pattern is simple. Lower magnification gives you steadiness and width. Higher magnification gives you reach but costs you stability and field of view.
Most people should start at 8x and move up only if they know they need more reach.
Objective Lens Size: What You Gain and Lose with 32mm, 42mm, and 50mm
The objective lens size determines how much light the binocular collects. More light means a brighter image, especially in low light conditions. But larger lenses also mean more weight and bulk.
There is no free lunch here.
If you mostly use binoculars during the day, a 32mm objective lens is a smart choice. It keeps the binocular lightweight and compact. A typical 8×32 weighs around 17 to 20 ounces.
That's comfortable for a day hike or a walk around the city. You sacrifice some brightness, but in full daylight, you won't notice the difference. The 4mm exit pupil is plenty for bright conditions.
If you need an all-around binocular that works in most conditions, 42mm is the sweet spot. An 8×42 gives you a 5.25mm exit pupil. That's bright enough for early morning and late evening use.
The weight ranges from 21 to 28 ounces, which is manageable for most people. This is why 8×42 is the most popular configuration in the world. It balances brightness, weight, and cost perfectly.
If you frequently watch wildlife at dawn or dusk, or if you plan to use binoculars for astronomy, go with 50mm or larger. The bigger lens collects more light, but the weight jumps to 30 ounces or more. You'll feel that around your neck after a few hours.
A harness can help, but the bulk is real. A 10×50 gives you a 5mm exit pupil, which is excellent for low light.
If you want the smallest possible binocular for travel or concerts, consider 25mm or 28mm. These compact binoculars fit in a jacket pocket. The trade-off is a small exit pupil, often around 3mm.
That's fine in bright light but useless in low light. You also get a narrower field of view and smaller eyecups. These are specialized tools, not general purpose binoculars.
Here's a quick comparison of objective lens sizes:
| Objective Size | Typical Weight | Exit Pupil (8x) | Best Use |
|---|---|---|---|
| 25–28mm | 10–14 oz | 3.1–3.5mm | Travel, concerts, daylight |
| 32mm | 17–20 oz | 4.0mm | Day hiking, lightweight carry |
| 42mm | 21–28 oz | 5.25mm | All-purpose, most conditions |
| 50mm | 30–36 oz | 6.25mm | Low light, astronomy |
| 56mm | 35–42 oz | 7.0mm | Extreme low light, astronomy |
The rule of thumb is simple. Match the objective lens to the light conditions you actually face. If you mostly bird in open fields at midday, a 32mm is plenty.
If you chase owls at dusk, you need 42mm or larger. If you're backpacking and every ounce counts, go with 32mm. If you're sitting in a blind or at a star party, 50mm makes sense.
Roof vs. Porro Prisms: The Real Trade-Off
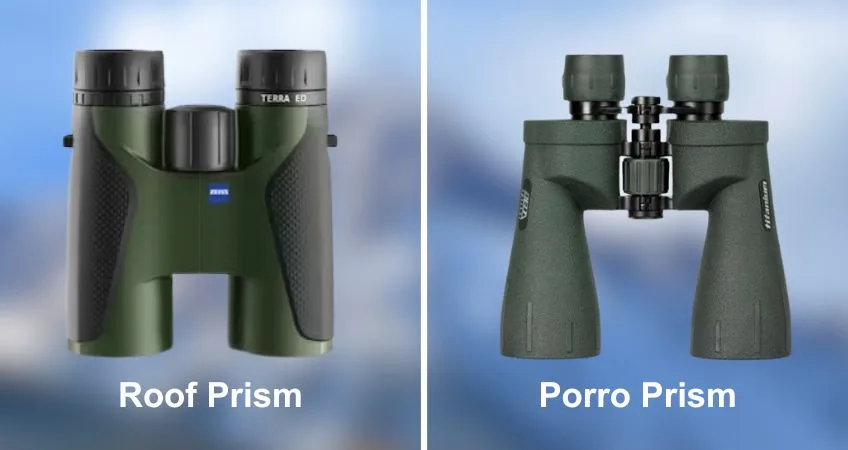
Image source: Bing (Web (fair-use with source credit))
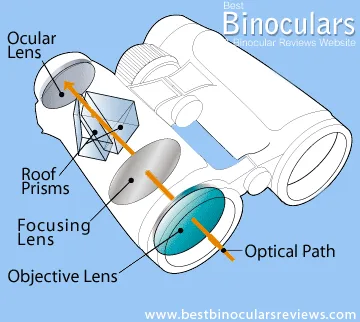
Inside every binocular, prisms bend the light path so the image appears right side up and the binocular body stays a reasonable length. Two main prism designs exist: roof and porro. The difference matters more than most people realize.
It affects image quality, price, and portability.
Porro prism binoculars have a classic offset shape. The objective lenses are wider apart than the eyepieces. This design is older and simpler to manufacture.
For the same price, a porro prism binocular typically delivers sharper images and better contrast than a roof prism model. The trade-off is size and bulk. Porro binoculars are wider and less streamlined.
They don't pack as easily.
Roof prism binoculars have a straight, compact body. The objective lenses line up directly with the eyepieces. This design is more complex and expensive to build well.
A good roof prism binocular requires phase correction coatings to maintain image quality. Without those coatings, the image looks softer and less contrasty. Manufacturer specifications confirm that high-end roof prism binoculars use dielectric coatings and phase correction to match or exceed porro quality.
If you are on a budget under $200, porro prism binoculars offer better optical performance for the money. You get clearer images and brighter views without spending extra. The downside is a bulkier shape that's harder to pack.
Many birders start with a porro model like the Nikon Action EX or similar. They deliver excellent value.
If you want a compact, durable binocular for hiking or travel, roof prism is the better choice. The streamlined body fits in a pack easily. Most premium binoculars from brands like Swarovski, Zeiss, and Leica use roof prisms.
But you pay a premium for that design. A good roof prism binocular typically costs two to three times more than a comparable porro.
If you need waterproof and fogproof performance, both designs can deliver it. But roof prism binoculars are easier to seal because of their simpler external shape. Many budget porro binoculars are not fully waterproof.
Check the specs carefully if you plan to use them in rain or near water.
Here's a side-by-side comparison:
| Factor | Porro Prism | Roof Prism |
|---|---|---|
| Image quality at same price | Better | Good, but costs more |
| Size and shape | Wider, bulkier | Slimmer, more compact |
| Price for good quality | $80–$200 | $200–$1,000+ |
| Waterproof sealing | Harder to seal | Easier to seal |
| Best for | Budget buyers, value | Hikers, travelers, premium users |
The choice comes down to your budget and your need for compactness. Porro wins on value. Roof wins on portability.
If you can afford a quality roof prism model with phase correction coatings, go for it. If you're watching your wallet, porro gives you more for your money. There is no wrong answer.
It depends on what you prioritize.
Features That Actually Matter: Eye Relief, Field of View, Coatings, and Waterproofing
Once you settle on magnification, objective size, and prism type, three other specs separate a good binocular from a frustrating one. Each one matters for a specific type of user.
How much eye relief do you need?
Eye relief is the distance between your eye and the eyepiece where you still see the full image. If you wear glasses, this is the most important spec on the list.
You need at least 15mm of eye relief for comfortable viewing with glasses. Many manufacturers list eye relief between 10mm and 20mm. If you wear glasses, aim for 17mm or more.
That gives you enough room to see the full field of view without pressing your glasses against the eyecups.
If you don't wear glasses, eye relief matters less. You can twist the eyecups up or down to find a comfortable position. But even for non-glasses users, short eye relief means your eyelashes hit the lens.
That's annoying and leaves smudges.
Twist-up eyecups with click stops make this adjustment easy. You set them to a comfortable height and they stay there. Cheaper binoculars often use fold-down rubber eyecups.
They work but wear out faster.
Why field of view matters more than you think
Field of view is how wide the scene appears through the binoculars. It's measured in feet at 1,000 yards. A wider field of view makes it easier to find and follow moving subjects.
For birding and wildlife, a field of view of 330 feet or more at 1,000 yards is good. An 8×42 typically offers 340 to 420 feet. A 10×42 often drops to 300 to 340 feet.
That's the trade-off. Higher magnification narrows your view.
If you've ever struggled to find a bird in the trees, you were fighting a narrow field of view. Aggregate reviews show that people who switch from 10x to 8x often report that the wider view makes birding more enjoyable. They see more of the scene and find birds faster.
For stargazing, a wide field of view helps you scan the Milky Way. For sports, it helps you track the ball across the field. For hunting in thick cover, it helps you spot movement.
Wide field of view is almost always better unless you're trying to pick out details at extreme distances.
Lens coatings: what they actually do
Lens coatings reduce glare and improve light transmission. Every lens surface reflects some light. Coatings cut that reflection and send more light to your eye.
The coating types are easy to rank. Fully coated means every lens surface has a single coating layer. Multi-coated means some surfaces have multiple layers.
Fully multi-coated means every surface has multiple layers. That's the best.
Phase correction coatings are specific to roof prism binoculars. They correct a phase shift that happens when light passes through the roof prism. Without phase correction, the image looks softer and less contrasty.
If you buy a roof prism binocular, make sure it has phase correction. Most models above $150 include it.
Dielectric coatings are a premium upgrade for roof prism prisms. They reflect more light than standard aluminum or silver coatings. The result is a brighter, more color-accurate image.
You'll find dielectric coatings on binoculars above $500.
Waterproofing and fogproofing
Waterproof binoculars are sealed with O-rings to keep moisture out. A waterproof rating of IPX7 means the binocular can survive submersion in one meter of water for 30 minutes. That's enough for rain, splashes, or an accidental drop in a stream.
Fogproofing is different. Fogproof binoculars are filled with nitrogen or argon gas. This prevents internal fogging when you move from cold air to warm air.
If you bird in winter or hike in humid climates, fogproofing matters. Without it, the lenses can fog up internally and stay fogged for hours.
Not all budget binoculars are waterproof. Check the specs. If you plan to use binoculars outdoors in any weather, waterproof and fogproof are worth the extra cost.
You don't want to ruin a $200 binocular in a rain shower.
The Most Common Mistakes Buyers Make
After analyzing thousands of buyer reviews and forum discussions, a clear pattern of mistakes emerges. Here are the most common ones and how to sidestep each.
Mistake one: buying too much magnification
This is the number one mistake. People see 10x, 12x, or 16x on the box and think more is better. But higher magnification magnifies your hand shake.
At 10x, most people see noticeable shake. At 12x, the image bounces around. At 16x, you need a tripod.
The fix is simple. If you're not sure, buy 8x. It's steady enough for most people.
The image stays calm. You can see more detail in a steady 8x image than in a shaky 10x image.
Mistake two: ignoring eye relief
Glasses wearers buy binoculars with 10mm or 12mm of eye relief. Then they can't see the full image. They get black rings around the edges or have to press their glasses into the eyecups.
It's frustrating and avoidable.
Check the eye relief spec before you buy. If you wear glasses, aim for 17mm or more. If the spec sheet doesn't list eye relief, look for a different model.
Mistake three: buying a compact binocular for low light
A compact 8×25 is great for a concert or a hike in bright sun. But the exit pupil is only 3.1mm. That's fine at noon.
At dusk, the image goes dark. Your pupils dilate to 5mm or more, but the binocular can only deliver 3mm of light.
If you bird in the early morning or late evening, you need a larger objective lens. An 8×42 or 10×50 will give you a bright image when light is low. Compact binoculars are for daylight only.
Mistake four: skipping the diopter adjustment
The diopter ring adjusts the focus for the difference between your left and right eye. Most people never touch it. They just use the center focus wheel.
But that means one eye is always slightly out of focus.
The fix takes 30 seconds. Cover the right objective lens. Focus the center wheel until the left image is sharp.
Then cover the left lens. Adjust the diopter ring until the right image is sharp. Now both eyes see clearly.
Reset the diopter if someone else uses your binoculars.
Mistake five: buying based on brand alone
Some brands make excellent binoculars. Others make cheap optics with a familiar logo. Brand name does not guarantee quality at every price point.
A $50 pair of binoculars from a premium brand is still a $50 pair of binoculars.
Compare specs, not logos. Look at the coatings, the prism type, the eye relief, and the warranty. A lesser-known brand with fully multi-coated lenses and phase correction can outperform a famous brand with basic coatings.
Mistake six: ignoring the weight
A 32-ounce binocular feels fine in the store. After three hours around your neck, it hurts. Many people buy a 10×50 for hiking and regret it halfway up the trail.
Weigh your options literally. If you plan to carry binoculars for hours, stay under 25 ounces. Under 20 ounces is even better.
Use a binocular harness to distribute the weight across your shoulders instead of your neck.
A Quick Decision Guide: What to Buy Based on Your Use Case
Here is the practical summary. Match your use case to the recommended specs. This is the if/then logic that makes the decision simple.
If you are a birder
Buy an 8×42 with a wide field of view. Look for 340 feet or more at 1,000 yards. Eye relief of 15mm or more.
Fully multi-coated lenses. If you can afford it, get phase correction and dielectric coatings for the best image quality. Weight around 22 to 26 ounces.
If you are a hiker or backpacker
Buy an 8×32. The 32mm objective keeps the weight under 20 ounces. The 4mm exit pupil is fine for daylight use.
Look for waterproof and fogproof construction. Roof prism models pack more easily. Stick to 8x magnification for stability on the trail.
If you are a hunter
Your choice depends on the terrain. For open fields, a 10×42 gives you reach. For thick woods, an 8×32 or 7×35 gives you a wider field of view.
If you hunt at dawn or dusk, prioritize a large exit pupil. A 10×50 or 8×56 works well. Waterproof and fogproof are non-negotiable.
If you are a stargazer
Buy a 7×50 or 10×50. The 50mm objective collects plenty of light. The 7x version gives you a wider, steadier view.
The 10x version shows more detail on the moon and planets. Either way, a tripod adapter helps you hold the binocular steady for long sessions.
If you go to sports or concerts
Buy a compact 8×25 or 8×32. The small size fits in a bag or jacket pocket. You don't need high magnification for events.
The wide field of view of an 8x helps you follow the action. Eye relief matters here if you wear glasses. Most venues allow binoculars but check the rules.
If you want a single pair for everything
Buy an 8×42. It's the best compromise. Bright enough for low light.
Light enough for hiking. Wide enough for birding. Stable enough for handheld use.
It's the most popular configuration for a reason. You can spend $150 or $1,500 and get a good 8×42.
Frequently Asked Questions
What does 8×42 mean on binoculars?
The first number is the magnification. It makes objects appear eight times closer. The second number is the objective lens diameter in millimeters.
It controls how much light enters the binocular.
Is 10x or 8x better for birding?
8x is better for most birders. It gives you a wider field of view and a steadier image. You can find and follow birds more easily.
Only switch to 10x if you bird in very open areas and need extra reach.
Do I need to spend a lot for good binoculars?
No. A good pair of binoculars costs between $150 and $300. That range gets you fully multi-coated lenses, decent prisms, and waterproof construction.
Above $500, you pay for premium glass, better coatings, and lighter materials.
How do I clean binocular lenses safely?
Use a lens brush or blower to remove dust. Then use a microfiber cloth with lens cleaning solution. Never use paper towels, tissues, or your shirt.
They scratch the coatings. Store binoculars with the lens caps on.
What is the best binocular for someone who wears glasses?
Look for eye relief of 17mm or more. Twist-up eyecups let you set the distance. An 8×42 with long eye relief works well.
Test the binocular in a store if possible. Make sure you can see the full field of view with your glasses on.
How long do binoculars last?
A well-made pair of binoculars can last 20 years or more. The key is proper storage. Keep them in a dry, cool place.
Avoid dropping them. Clean the lenses regularly. Many premium brands offer lifetime warranties, which tells you they expect their products to last.