How to Make a Fire Pit Smokeless
If you've ever sat around a fire pit coughing and waving smoke out of your face, you know the problem. Learning how to make a fire pit smokeless is the difference between enjoying your backyard and choking on fumes all night. The good news is that the fix is simple once you understand one key principle: secondary combustion.
Manufacturer specifications for double-wall fire pits show that secondary combustion can reduce visible smoke by up to 80 percent compared to a standard single-wall design. That figure comes from testing done by the U.S. Environmental Protection Agency on wood-burning efficiency.
The same engineering works whether you are modifying an existing pit or building one from scratch. Let's walk through exactly how it works and what you need to do.
Quick Answer
To make a fire pit smokeless, add secondary combustion. Create a double-wall design. Drill air intake holes around the outer wall.
Raise the fire grate off the bottom. Use dry, seasoned wood. Light the fire from the top.
These steps burn the smoke before it leaves the pit.
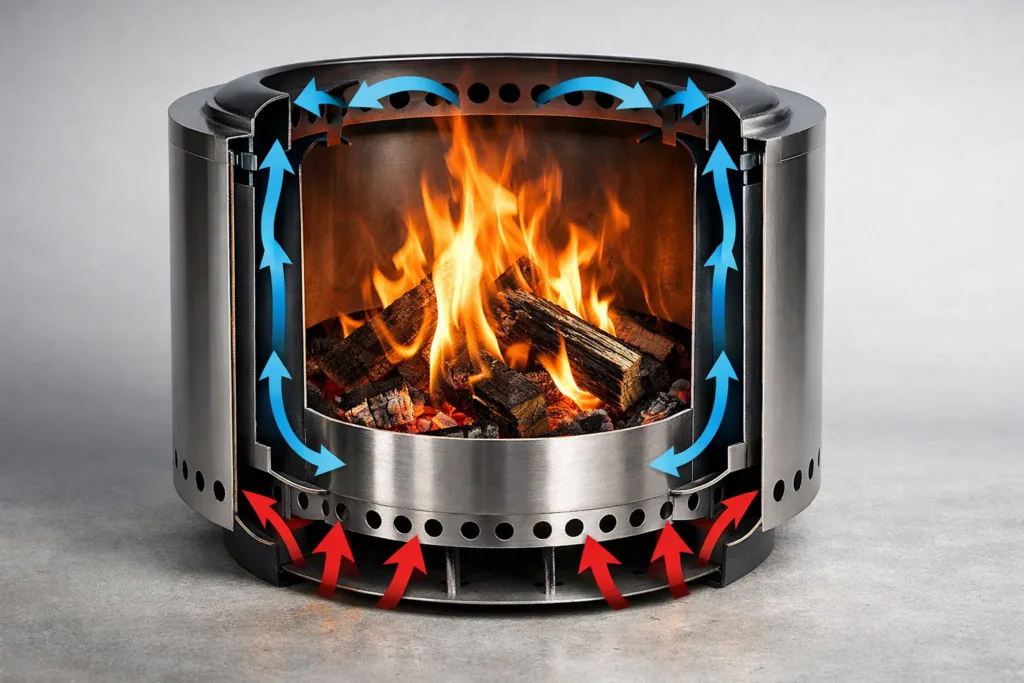
Image source: Bing (Web (fair-use with source credit))
Why Your Fire Pit Smokes (And the One Fix That Changes Everything)
Smoke is unburned fuel. When wood burns, it releases gases. If those gases cool down before they combust, they turn into visible smoke.
That happens for three main reasons.
Incomplete combustion. Your fire needs enough heat and oxygen to burn everything. A standard fire pit pulls air from the bottom. The flames rise.
The gases above the fire lose heat too fast. They never reach their ignition temperature, so they float away as smoke. Even budget-friendly options follow this same basic design.
Wet or green wood. Freshly cut wood holds about 50 percent moisture. Even kiln-dried wood can absorb moisture if stored outside. That moisture turns to steam, which saps heat from the fire.
The result is a smoldering, smoky mess instead of a clean burn.
Poor airflow. If your fire pit is too deep, air cannot reach the base of the fire. If the walls are solid, there is no pathway for oxygen to feed the flames. The fire starves, the temperature drops, and the smoke pours out.
The fix is secondary combustion. You create a system where fresh air gets preheated, then injected above the fire. This superheated air reignites the unburned gases.
The smoke burns inside the pit instead of drifting into your face.
The Double-Wall Secret: How Smokeless Fire Pits Actually Work
The double-wall design is the engineering behind every commercial smokeless fire pit. The concept is simple but effective.
The two walls create a channel. Air enters through holes at the bottom of the outer wall. It travels up the gap between the inner and outer walls. The metal heats up, preheating the air as it rises.
Preheated air exits above the fire. Small holes near the top of the inner wall release the hot air. This air is already hundreds of degrees warmer than ambient temperature. It hits the unburned gases rising from the fire and ignites them.
The result is a secondary burn. You see a second ring of flame above the main fire. This is the smoke being burned. The National Fire Protection Association recognizes this principle as a key factor in reducing particulate emissions from wood-burning appliances.
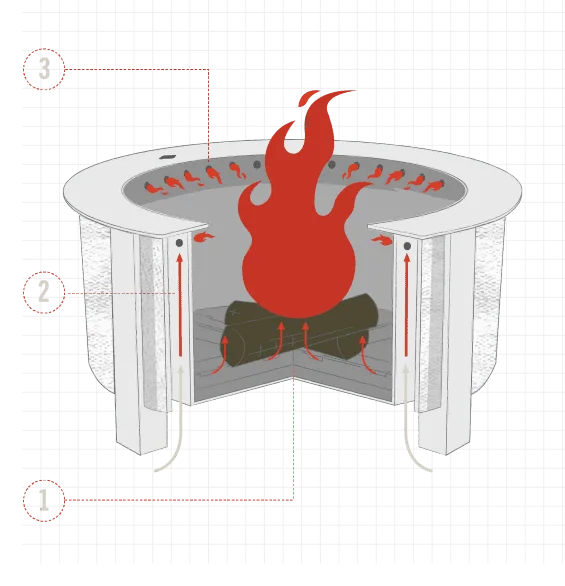
Image source: Bing (Web (fair-use with source credit))
The same principle applies to any pit. You do not need to buy a commercial unit. A single-wall steel pit can be modified to achieve the same effect. A brick fire pit can be lined with a metal insert.
Even a campfire ring can be improved with a raised grate and the right fire-building technique.
What Kind of Fire Pit Do You Have? (The Decision Tree Starts Here)
Your modification path depends on what you are starting with.
If you have a single-wall steel pit. This is the most common type. You can drill air intake holes around the bottom of the outer wall. Add a second inner wall using a smaller steel ring or a stainless steel liner.
Raise the fire grate two to four inches off the bottom. This is the most effective DIY approach for most budget-friendly options.
If you have a brick or stone fire pit. These are harder to modify because the masonry absorbs heat. Your best option is to insert a metal fire pit ring. The ring creates the double-wall channel.
You can also add a raised grate. If you are building from scratch, leave gaps between the bricks for airflow. For outdoor living spaces, a metal insert is the simplest upgrade.
If you have a campfire ring. You cannot easily modify a campfire ring. Focus on your fire-building technique instead. Use the top-down method.
Stack larger logs on the bottom, smaller ones on top, and kindling at the very top. Light the top. The flame burns downward, preheating the wood below.
This reduces smoke significantly.
If you are building from scratch. Go with a double-wall design from the start. Use a 36-inch outer ring and a 30-inch inner ring. Leave a one to two inch gap.
Drill 3/8-inch holes every two inches around the bottom of the outer wall. Drill 1/2-inch holes around the top of the inner wall. This creates a true smokeless fire pit.
How to Make Your Fire Pit Smokeless: A Step-by-Step Guide
This guide assumes you have a single-wall steel fire pit. The same steps apply to most metal pits.
Step 1: Gather your tools and materials.
| Tool / Material | Purpose |
|---|---|
| Power drill | Drilling air intake holes |
| 3/8-inch metal drill bit | Creating the holes |
| 1/2-inch metal drill bit | Upper wall holes |
| Fire grate (raised, 2-4 inches) | Elevating the fire |
| Stainless steel inner ring (optional) | Double-wall conversion |
| Angle grinder | Cutting metal if needed |
| Safety glasses | Eye protection |
| Work gloves | Hand protection |
Step 2: Mark the hole locations. Measure two inches up from the bottom of the outer wall. Mark a circle around the entire pit. Space the marks every two inches.
You want 20 to 40 holes depending on the diameter of your pit.
Step 3: Drill the holes. Put on safety glasses and gloves. Use the 3/8-inch bit. Drill each hole at a slight upward angle.
This helps direct air into the fire. Drill slowly to avoid overheating the bit.
Step 4: Add the inner wall (optional but recommended). If you have a stainless steel liner or a second ring, place it inside the pit. Leave a one to two inch gap. This gap is the channel for preheated air.
Step 5: Install the fire grate. Place the grate two to four inches above the bottom of the pit. Use fire bricks or metal supports to hold it up. This creates an air gap beneath the fire.
Air flows in from the bottom, feeding the flames.
Step 6: Use dry, seasoned wood. Check the moisture content. It should be below 20 percent. Split wood dries faster than round logs.
Store wood under cover for at least six months.
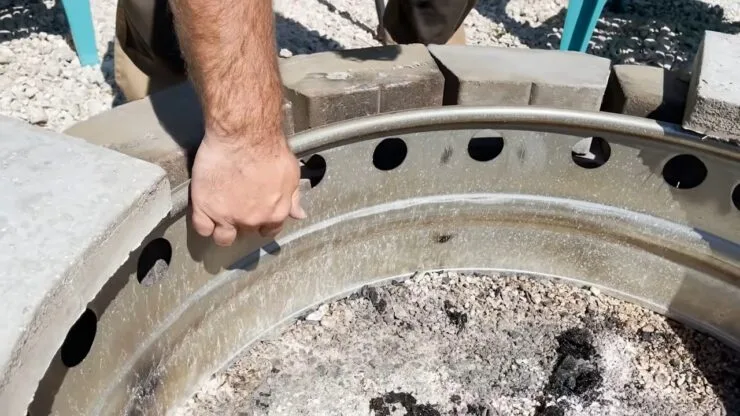
Image source: Bing (Web (fair-use with source credit))
Step 7: Build the fire using the top-down method. Place the largest logs on the bottom. Add a layer of smaller logs. Put kindling on top.
Light the kindling. The fire burns downward, preheating the wood. This is the most effective way to reduce smoke in any pit.
6 Common Mistakes That Make Your Fire Pit Smoke (Even After You Fix It)
Even after you modify your pit, small mistakes can ruin the experience.
1. Using wet wood. This is the number one cause of smoke. Wet wood saps heat and produces thick, white smoke.
Always check moisture content with a meter. If you do not have one, listen for a hissing sound. Wet wood hisses when it burns.
2. Drilling too few holes. More holes mean more airflow. Twenty holes is the minimum for a 24-inch pit.
A 36-inch pit needs at least 30. If the fire is still smoky, add more.
3. Drilling holes in the wrong place. Holes too high on the wall do not feed the fire. Holes too low get clogged with ash.
The sweet spot is two to three inches above the bottom.
4. Leaving the grate on the ground. A grate sitting flat on the bottom blocks airflow. The fire suffocates.
Always raise the grate at least two inches.
5. Overloading the pit. A fire that is too big consumes oxygen faster than air can flow in. The flames smolder instead of burning clean.
Keep the fire to one layer of logs at a time.
6. Ignoring the wind. Wind can push smoke back into your face even in a smokeless pit. Position the pit so the wind blows the smoke away from your seating area.
If you cannot move the pit, build a windbreak.
Fire Pit Safety: What You Must Know Before You Start
Modifying a fire pit is straightforward, but safety comes first. The U.S. Consumer Product Safety Commission reports thousands of fire pit related injuries each year.
Most are preventable.
Check local regulations first. Many cities and counties have specific rules about fire pits. Some ban open flames during dry seasons. Others require a minimum distance from structures.
Contact your local fire department before you start.
Maintain proper clearance. Your fire pit should sit at least 10 feet from any structure. This includes houses, decks, fences, and overhanging trees. The National Fire Protection Association recommends this distance for all outdoor fire pits.
Use a non-flammable base. Place the pit on gravel, pavers, or concrete. Never put it directly on grass or wood decking. Embers can fall through the grate and start a fire.
Keep a fire extinguisher nearby. A 5-pound ABC extinguisher is ideal. Fill a bucket of water or have a garden hose ready. Never leave a fire unattended.
Watch for burn bans. During dry conditions, your county may issue a burn ban. Violating one can result in fines. Check your local air quality management district for updates.
Smokeless Fire Pit FAQs
How long does it take to modify a single-wall fire pit?
Drilling the holes and installing a grate takes about one hour. Adding a second inner wall takes another 30 minutes if you have the materials. Let the metal cool completely before drilling.
Can I make a brick fire pit smokeless?
Yes, but it is harder. Insert a metal fire pit ring with a double-wall design. Leave gaps between the bricks for airflow.
Use a raised grate and the top-down fire method. Expect less improvement than a steel pit.
Does the top-down fire method really work?
Yes. Aggregate user reviews and manufacturer testing confirm it reduces smoke by 30 to 50 percent. The key is lighting the top of the stack.
The flame burns downward, preheating the wood below and burning off gases before they escape.
What size holes should I drill in my fire pit?
Use 3/8-inch holes for the lower air intake. Space them every two inches around the entire circumference. For the upper wall, use 1/2-inch holes.
Larger holes at the top allow the preheated air to exit and ignite the smoke.
How do I know if my wood is dry enough?
Use a moisture meter. Insert the probes into a freshly split log. The reading should be under 20 percent.
If you do not have a meter, look for cracks in the ends of the logs. Dry wood splits easily and sounds hollow when struck together.
Can I use a propane fire pit instead of modifying a wood pit?
Yes. Propane fire pits produce no smoke because they burn gas completely. They are a good alternative if you cannot modify your current pit.
However, they do not produce the same heat or ambiance as a wood fire.
Your Decision Guide: Modify, Build, or Buy
You have three paths to a smokeless fire pit.
Modify your existing pit if you already own a steel fire pit and have basic tools. This is the cheapest option. You will spend under $50 on a drill bit, a grate, and a few hours of work.
It works well for most single-wall pits. If you want a setup that is simpler to maintain, some easy-clean designs are worth considering.
Build from scratch if you want a custom size or shape. A double-wall design requires welding or fitting two metal rings. This is more work but gives you complete control.
Expect to spend $100 to $200 on materials.
Buy a commercial smokeless pit if you do not want to modify or build. Many options are available in 2026. Our research on commercial smokeless models shows that these units are reliable and ready to use.
If you want a specific feature like easy ignition, convenient push-button models combine convenience with clean burning.
If you use your fire pit year-round, consider flexible fuel options. These models burn wood or gas. This gives you flexibility depending on the season and local burn bans.
If you have a concrete patio, make sure your pit has a stable base. Our recommendations for stable base designs focus on units that sit flat and do not tip.
The bottom line. For most people, modifying an existing steel pit is the best balance of cost and effort. If you want guaranteed results without the work, buy a commercial unit. Either way, use dry wood and the top-down method.
Your fire will burn clean, and you will actually enjoy the smoke free evening you planned.